A leaking toilet is one of the most common plumbing problems homeowners face. If you notice water pooling around the base of your toilet, a damaged wax ring could be the culprit.
The wax ring forms a watertight seal between the toilet and the drainpipe. Over time, this seal can deteriorate, allowing water to escape every time the toilet is flushed.
In this guide, we’ll explain how to replace a toilet wax ring and stop leaks before they cause costly damage to your flooring and subfloor structure.
What Is a Toilet Wax Ring?
A wax ring is a circular seal made from wax that sits between the toilet outlet and the floor flange.
Its purpose is to:
- Prevent wastewater leaks
- Stop sewer gases from entering the home
- Create a watertight seal
Signs Your Toilet Wax Ring Needs Replacing
You may need a new wax ring if you notice:
- Water around the toilet base
- Bad sewage smells
- Toilet rocking or moving
- Damp flooring around the toilet
- Water stains on ceilings below upstairs bathrooms
Important:
A leaking wax ring should be repaired as soon as possible to prevent floor damage and mould growth.
Tools You’ll Need
Before starting, gather:
- Adjustable wrench
- Putty knife
- Sponge or towel
- Bucket
- New wax ring
- Rubber gloves
- Toilet bolts (recommended)
- Cleaning cloths

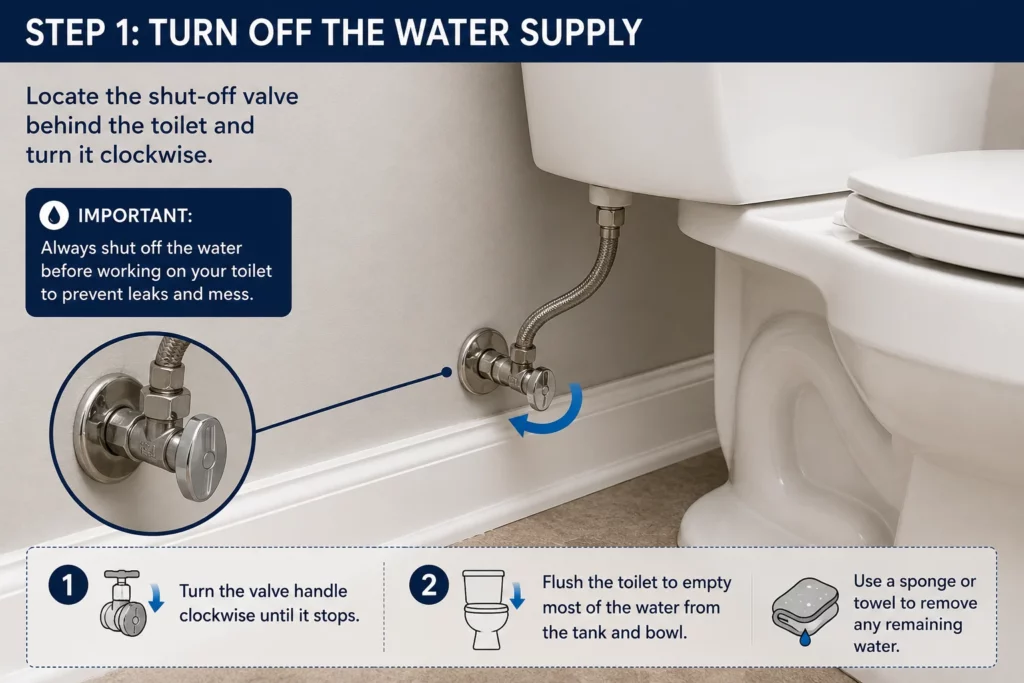
Step 1: Turn Off the Water Supply
Locate the shut-off valve behind the toilet and turn it clockwise.
Flush the toilet to empty most of the water from the tank and bowl.
Use a sponge or towel to remove any remaining water.
Step 2: Disconnect the Toilet
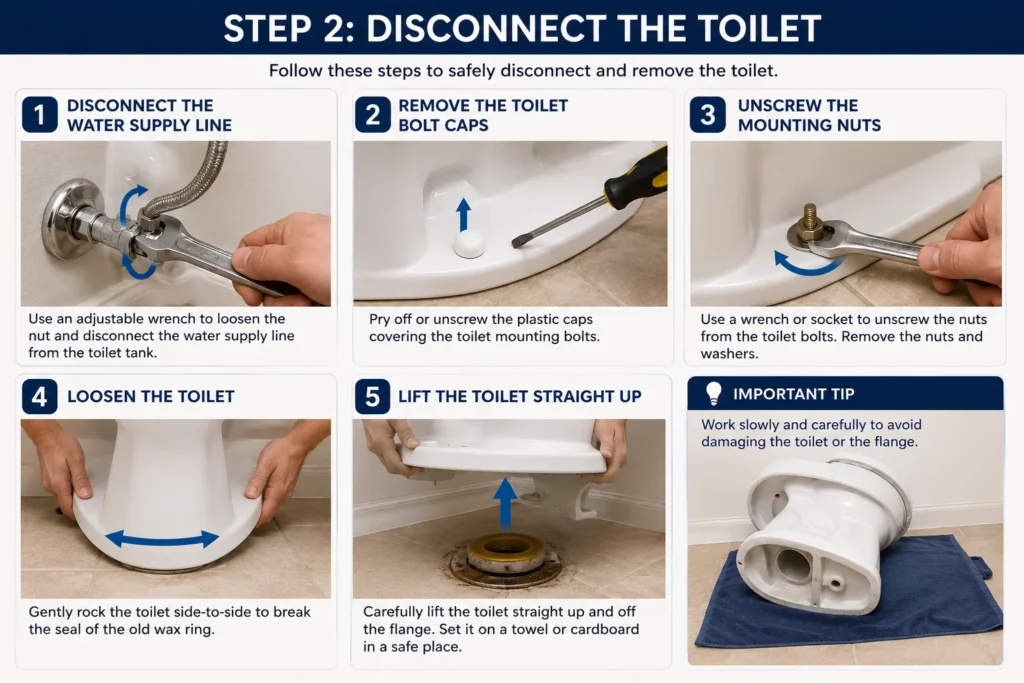
Using an adjustable wrench:
- Disconnect the water supply line.
- Remove the toilet bolt caps.
- Unscrew the mounting nuts.
Carefully rock the toilet side-to-side until it loosens.
Lift the toilet straight up and place it on an old towel or cardboard.
Step 3: Remove the Old Wax Ring
Use a putty knife to scrape away the old wax from:
- The toilet outlet
- The floor flange
Dispose of the old wax ring immediately.
Inspect the flange for cracks or damage.
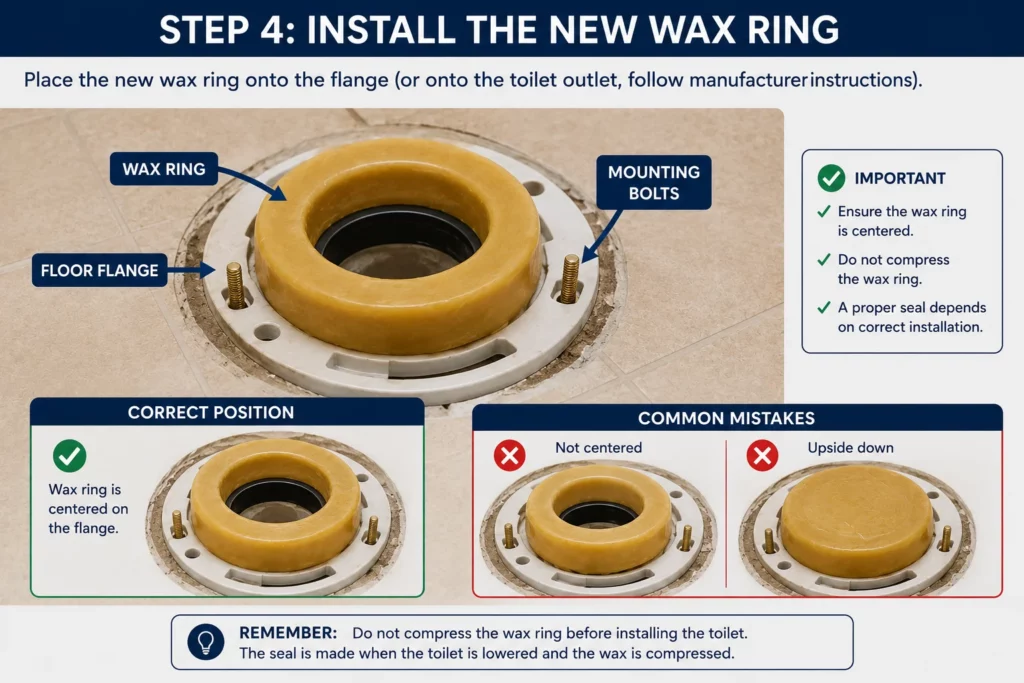
Step 4: Install the New Wax Ring
Place the new wax ring directly onto the flange or toilet outlet, depending on manufacturer instructions.
Ensure it is centered properly.
Do not compress the wax ring before installing the toilet.
Step 5: Reinstall the Toilet
Carefully lower the toilet onto the flange.
Align the mounting bolts with the holes in the toilet base.
Apply firm downward pressure to compress the wax ring evenly.
Reinstall the nuts and tighten gradually on alternating sides.
Important:
Do not overtighten as this can crack the porcelain.

Step 6: Reconnect Water and Test
Reconnect the water supply line.
Turn the water supply back on.
Flush the toilet several times while checking for leaks around the base.
If no leaks appear, the repair is complete.
When Should You Call a Professional Plumber?
While replacing a wax ring is considered a DIY-friendly repair, some situations require professional assistance:
- Cracked floor flange
- Severe floor damage
- Persistent leaks after replacement
- Sewage smells that continue
- Multiple toilet plumbing issues
Professional plumbers can identify underlying problems that may not be visible during a simple wax ring replacement.
Final Thoughts
A faulty wax ring is often the cause of a leaking toilet, but replacing it promptly can prevent significant water damage and costly repairs.
If you’re comfortable with basic DIY tasks, replacing a wax ring can be completed in a few hours. However, if you encounter damaged components or ongoing leaks, it’s best to contact a professional plumber.
At K-Plumbing, we provide professional toilet repairs, leak detection, and emergency plumbing services to help homeowners resolve plumbing issues quickly and correctly.